
How to set parental checks on iOS 26 and iPados 26
Apple iOS 26 makes it easier for parents to set up children’s accounts with a strong warranty and more control over what children can see and do. Here’s how to use it.
With the introduction of iOS 26 Apple, the process of setting a children’s account streamlined. The aim was to give parents a quick way to ensure that the child has an online experience with age.
This is useful to set Belcue Once, automatically allows several features to help keep children safe. This included the ability of parents to share their child’s age range with applications retaining privacy.
The app store automatically filters out applications that WoW consider to be an age-ii-inpopriat. And from iOS 26, Apple added more granular age rating for applications, included 13+, 16+ and 18+.
There are also widespread protection for adolescents 13 to 17. This primary focuses on increased warranty for protection against harmful content.
There are also extended communication limits that allow parents to approve new contacts on the child.
How to create a children’s account
Creating a children’s account is quite a simple process, but there is a bit of preparation you want to do first. Before starting, confirm that your device and all the devices you manage are updated to the latest version of the software.
You will also have to be an organizer of a family sharing or family shared by a parent or guardian.
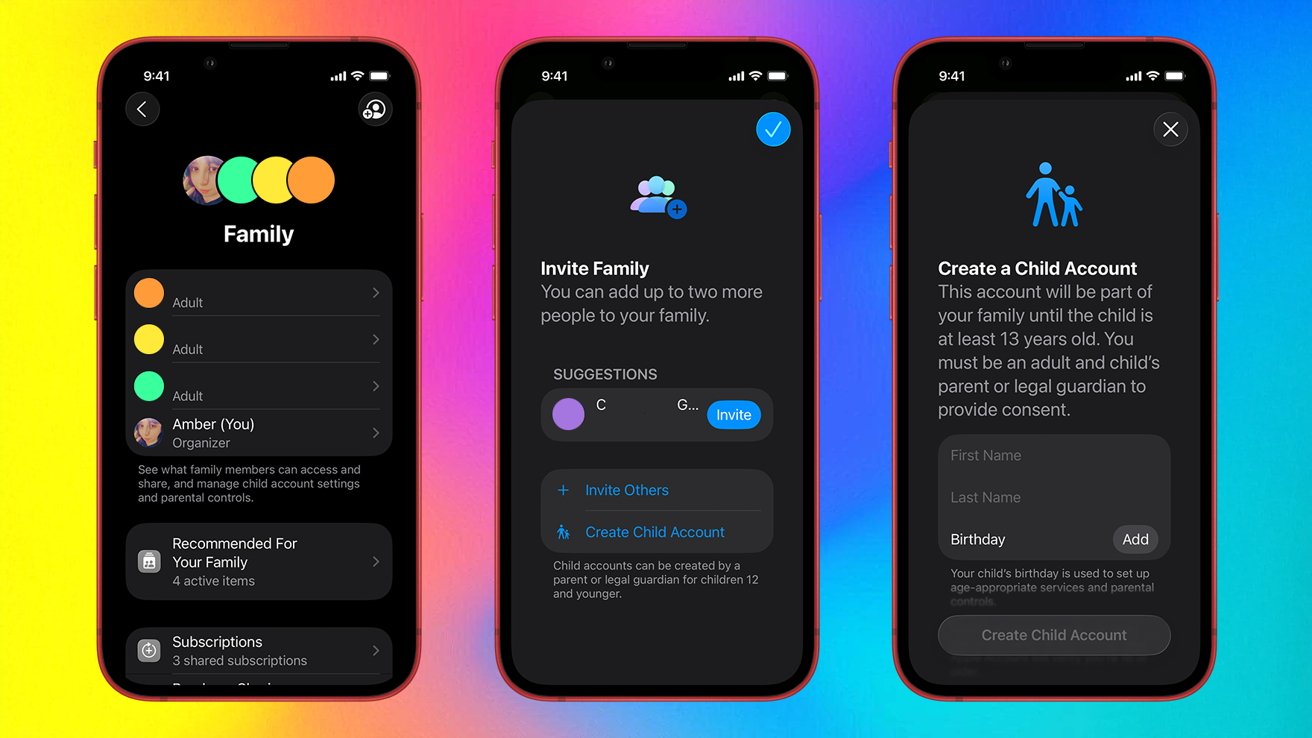
Creating a baby account from iPhone
You can choose from iPhone, iPad or even your Mac. Adults may need to confront their identity using a credit card or a valid ID recorded in the Apple wallet.
If you do this on iPad or iPhone, you need to
- OPEN Settings
- Tap Family
- Tap Add a member Button in the upper right corner
- Tap Create a kid’s account
- Tap Continuously
- Add the name and date of birth of the child
- Follow the instructions on the screen and complete the account settings
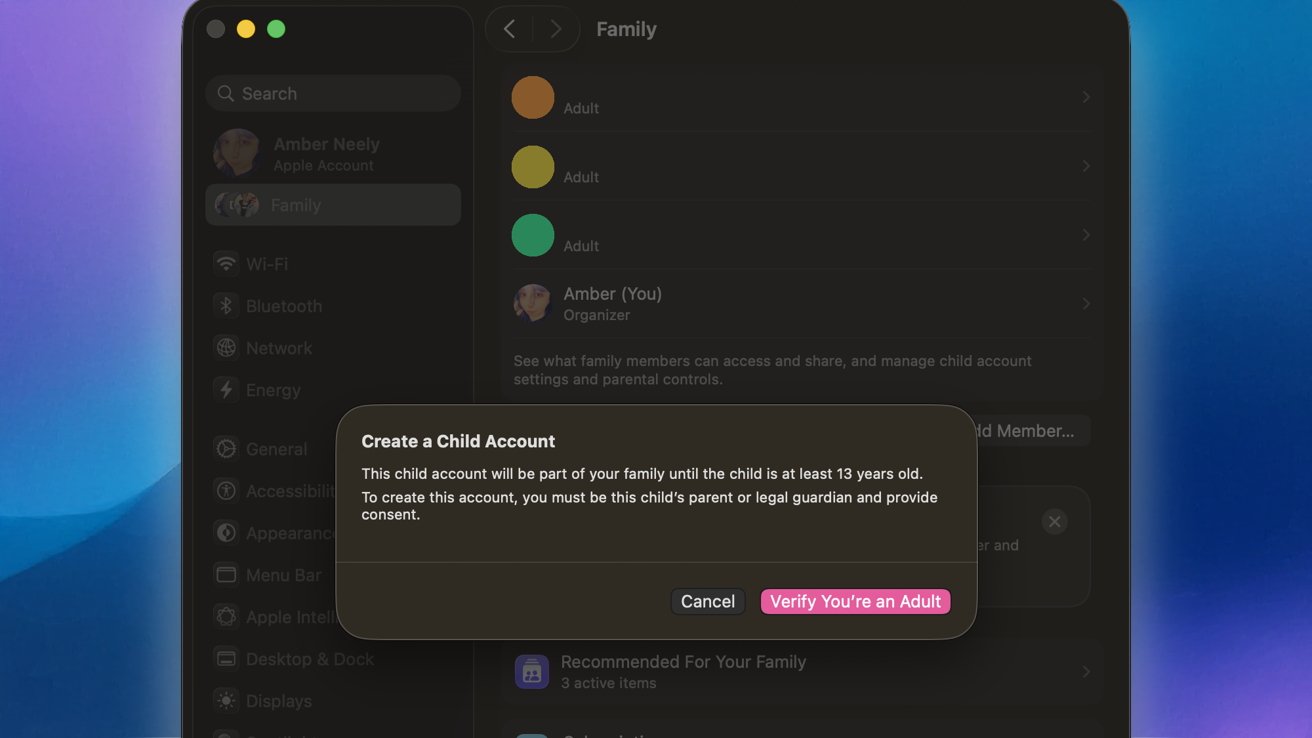
Adding a children’s account to your family group on Mac
If you do this on Mac, you can follow these steps:
- Click on Apple menu In the upper left corner of the screen
- Click Setting up a system
- Click Family
- Click Add a member
- Click Create a kid’s account
- Follow the instructions on the screen and create a children’s account.
Instructions for setting up and restrictions on children’s accounts may vary by country. In the United States, children’s accounts are required for children aged 13 years.
Other countries may require a child to correspond to anyone 14, 15 or even 16 years and younger.
Further customization of children’s protection elements
While Apple has actually streamlined your child’s account settings, you can continue to customize the restriction. This included setting of screen time limits, limiting purchases of app stores, and even deactivating Apple Intelligence.
The first thing you need to do is to allow the content and protection of personal data to your child’s device. Here’s how to do this:
- OPEN Settings
- Tap Screen time
- Under the family, your child’s name
- Tap Content and Privacy Contents and Privacyand enter the time access code on the screen
- Overcrowded Content and Privacy Contents and Privacy
Now that the content and protection of personal data are allowed, it is easy to set up specific restrictions on common activities. Here’s how to do it.
How to set the time limits of the screen per child
Setting adequate time limits on the screen is a great way to ensure that your child does not pretend their iPhone or iPad. Here you can decide to set the planned downtime and time limits of the application.
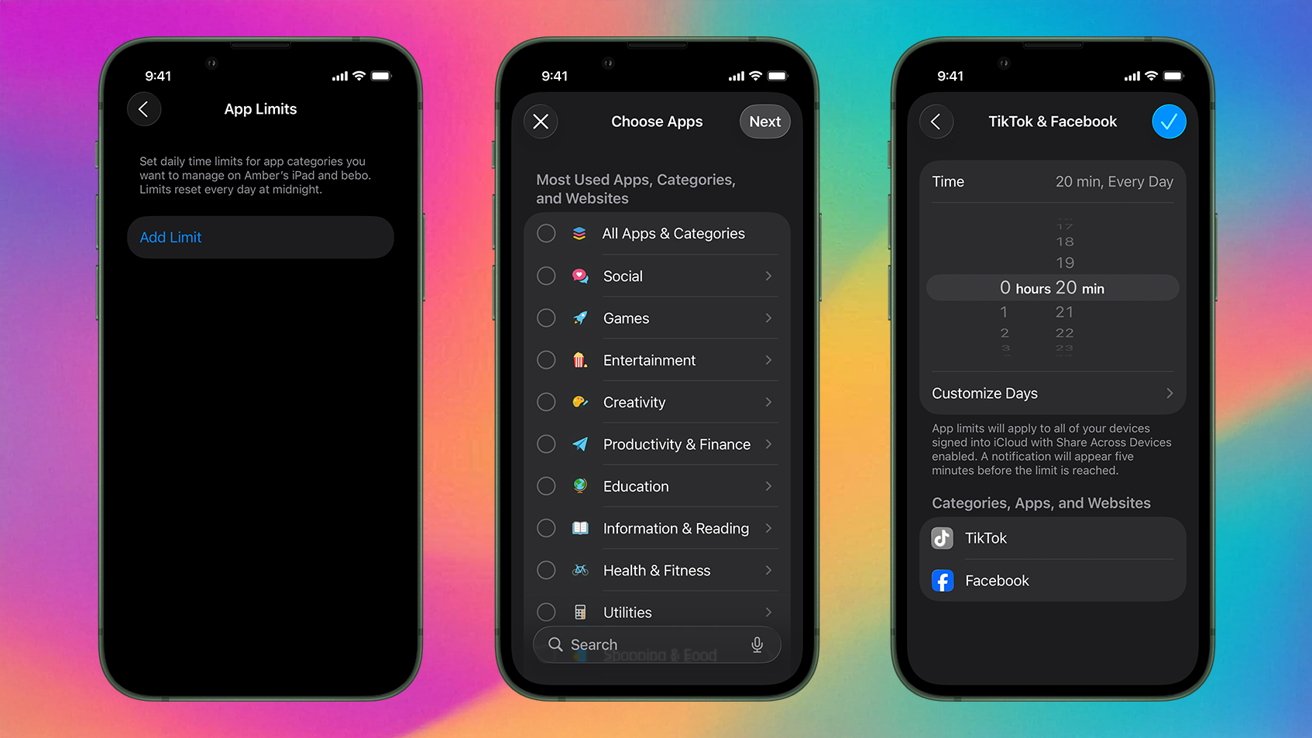
Setting the time limits of the screen on the iPhone
- OPEN Settings
- Tap Screen time
- Scroll down and click the settings you want to change
Currently, these are the following restrictions that you can introduce in the limit category:
- Downtime: Lets you set the time schedule from the screens for your child
- Limits of App: Allows you to set time limits for specific applications or categories of applications such as social media or game applications
- Always allowed: These applications are always enabled, regardless of other time limits. You can’t deactivate your phone even if you can set a restriction to who can be a contact
- Screen distance: This setting is designed to ensure that the user holds his device at a safe distance from their face – requires the functioning of the facial ID
How to turn on or off building applications and functions
Switching construction functions is an excellent place to start, especially if you have younger users of the device. From this section you can deactivate facetime, wallet, camera and more.
- OPEN Settings.
- Tap Screen time.
- Tap Content and Privacy Contents and Privacyand enter the time access code on the screen
- Tap Enabled applications and functions.
- Switch any application that you don’t want a child to have access
How to prevent the purchase of app stores, we have children’s iPhone or iPad
We all heard horror stories of parents who found their child purchased in the application of thousands of dollars. Fortunately, there is a quick way to guarantee it.
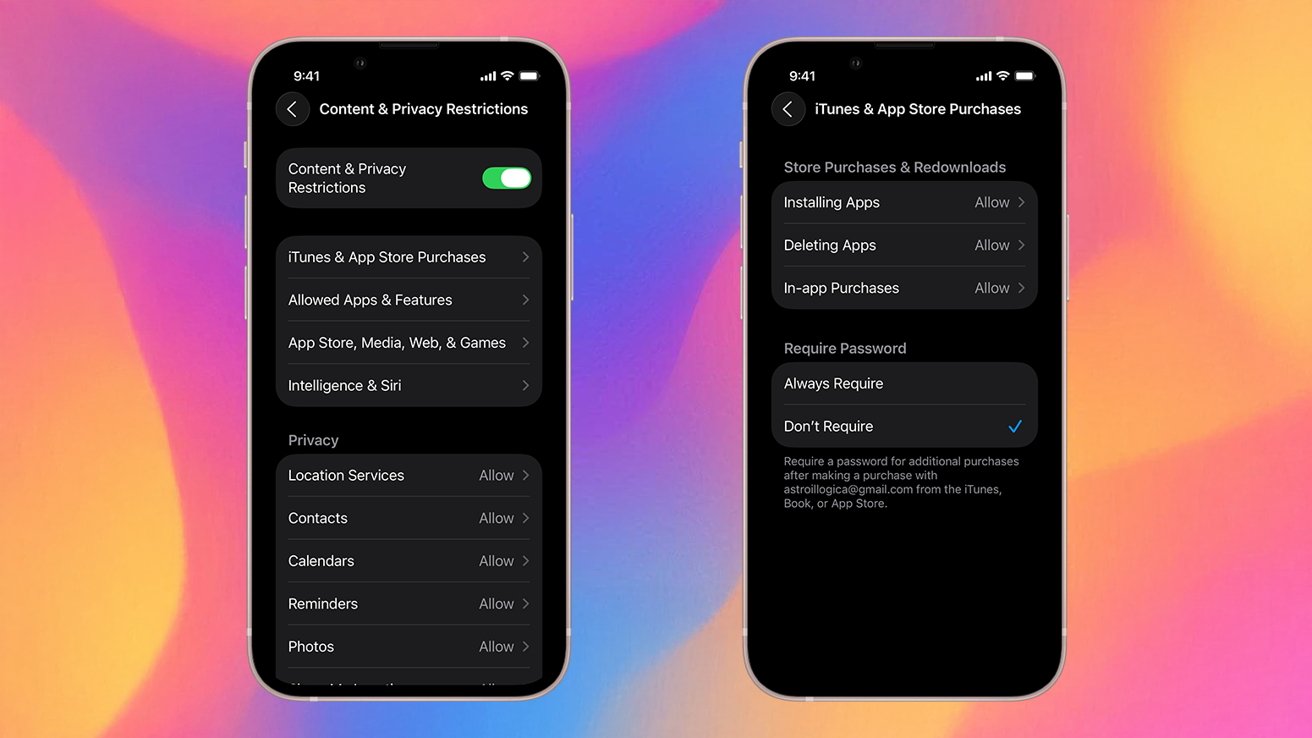
Restricting purchases of app stores can save you a lot of money and frustration
- OPEN Settings.
- Tap Screen time.
- Tap Content and Privacy Contents and Privacyand enter the time access code on the screen
- Tap iTunes & Buysases App Store
- Select settings and set to Do not allow
How to limit the features of games to iPhone or iPad
You can help your child play safer by limiting the types of interactions they have when they are mobile games. For example, you can be fine when your child plays multiplayer games, but it’s not right to send messages to other players with them.
Currently, restrictions only for games that use the functions of the game center.
- OPEN Settings.
- Tap Screen time.
- Tap Content and Privacy Contents and Privacyand enter the time access code on the screen
- Tap App Store, Media, Web and Games
- Tap Gaming center
- Set suitable for any function limitation
How to take explicit content and content rating, we have a child’s iPhone or iPad
Determination of content restrictions is essential for young users. These settings ensure that children see only the content of the corresponding age when music, podcasts, news, television shows, movies, books and more.
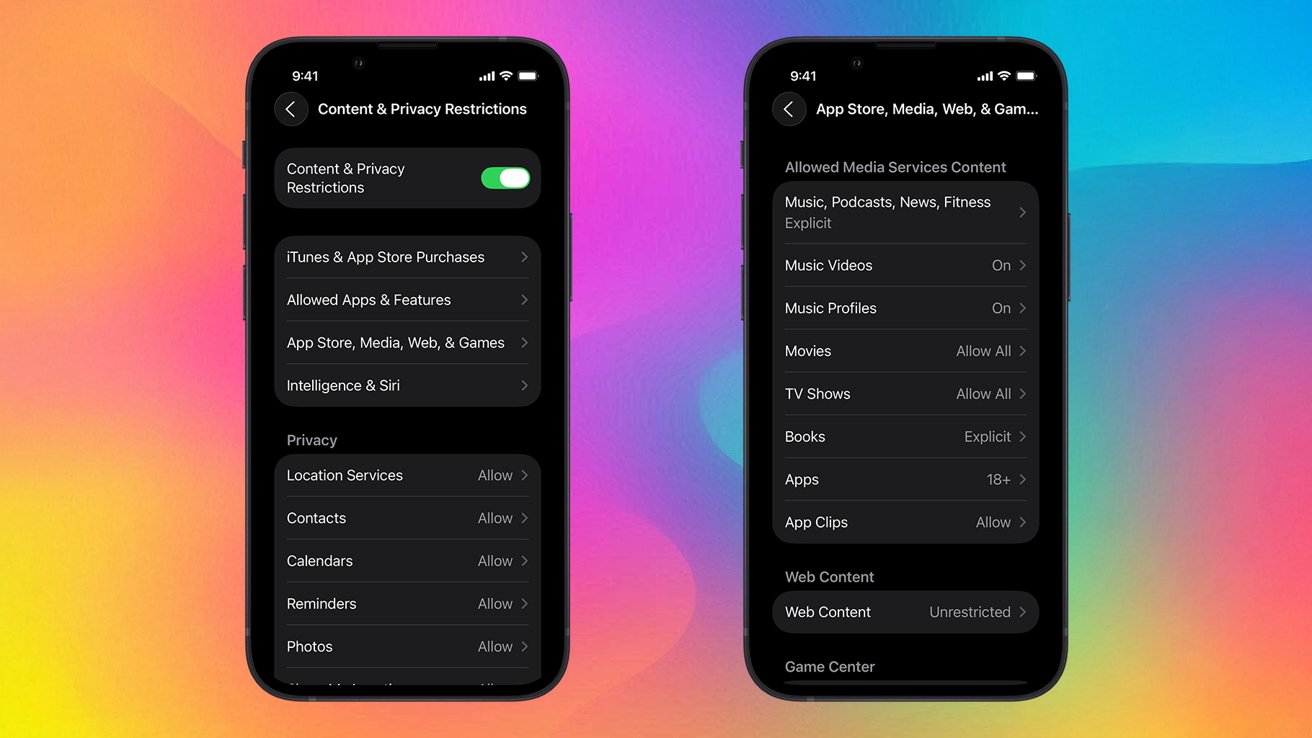
Easily a restric approach to explicit happy
- OPEN Settings.
- Tap Screen time.
- Tap Content and Privacy Contents and Privacyand enter the time access code on the screen
- Tap App Store, Media, Web and Games
- Set suitable for any function limitation
This is also the same part where you can limit access to adult content throughout the site. You can go a step further and add a specific site to approved or blocked lists or limit access to the approved site only.
How to enable or deactivate Apple Intelligence and Siri
In 2025, Apple introduced Apple Intelligence and Reduced Siri. Since many of these functions are still actively evolving, it is understandable that the parent does not want their child to have unlimited access to the machine learning content.
- OPEN Settings.
- Tap Screen time.
- Tap Content and Privacy Contents and Privacyand enter the time access code on the screen
- Tap Intelligence & Siri
- Switch any feature you want to limit access to